A physical assessment involves four basic techniques: inspection, palpation, percussion, and auscultation. Correct performance of these techniques helps elicit valuable information about a patient's condition.
Inspection requires the use of vision to observe details of the patient's appearance, behavior, and movement.
Use of special lighting and various pieces of equipment—such as an otoscope, a tongue blade, and an ophthalmoscope—may help enhance vision or examine an otherwise hidden area. Inspection begins during the first patient contact and continues throughout the assessment.
Palpation usually follows inspection, except when examining the abdomen or assessing infants and children. Palpation involves touching the body to determine the size, shape, and position of structures; detect and evaluate temperature, pulsations, and other movement; and elicit tenderness. The four palpation techniques are light palpation, deep palpation, light ballottement, and deep ballottement. Ballottement evaluates a flowing or movable structure. Performing ballottement involves applying pressure against the structure being assessed and then waiting to feel it rebound. For example, this technique is useful for checking the position of an organ or a fetus.
Percussion involves a quick, sharp tapping of the fingers or hands against a body surface to produce sounds, detect tenderness, or assess reflexes. Percussing for sound helps locate organ borders, identify organ shape and position, and determine whether an organ is solid or filled with fluid or gas. Organs and tissues produce sounds of varying loudness, pitch, and duration depending on their density. For example, air-filled cavities (such as the lungs) produce markedly different sounds from those produced by the liver and other dense organs and tissues. Percussion techniques include indirect percussion, direct percussion, and blunt percussion.
Auscultation involves using a stethoscope to listen to various sounds of the body, particularly those produced by the heart, lungs, vessels, stomach, and intestines. Most auscultated sounds result from the movement of air or fluid through these structures.
Auscultation usually occurs after the other assessment techniques; however, when assessing the abdomen, auscultation occurs after inspection but before percussion and palpation, which can alter bowel sounds. When assessing infants and young children, auscultation should also occur before percussion and palpation because infants and young children may start to cry when palpated or percussed. Auscultation is most successful in a quiet environment with a properly fitted stethoscope.
![]() Equipment
Equipment
- Disinfectant pad
- Flashlight or gooseneck lamp
- Patient drape
- Stethoscope
- Optional: gloves
![]() Preparation of Equipment
Preparation of Equipment
Inspect all equipment and supplies. If a product is expired, is defective, or has compromised integrity, remove it from patient use, label it as expired or defective, and report the expiration or defect as directed by your facility.
![]() Implementation
Implementation
- Gather and prepare the necessary equipment and supplies.
- Perform hand hygiene.
- Confirm the patient's identity using at least two patient identifiers.
- Provide privacy.
- Explain the procedure to the patient and family (if appropriate) according to their individual communication and learning needs to increase their understanding, allay their fears, and enhance cooperation.
- Raise the bed to waist level before providing care to prevent caregiver back strain.
- Ask the patient to undress and then drape the patient appropriately.
- Make sure that the room is warm and adequately lit to make the patient comfortable and aid visual inspection.
- Warm your hands and stethoscope.
- Perform hand hygiene.
- Put on gloves, as needed, to comply with standard precautions.
Inspection
- Use your eyes to observe the patient. Pay attention to the details of the patient's appearance, behavior, and movement, such as facial expressions, mood, body habits, and conditioning.2 Focus on areas related to the patient's reason for seeking care.
- To inspect a specific body area:
- Be sure to expose the area sufficiently.
- Survey the entire area, noting key landmarks and checking the overall condition.
- Focus on specifics: color, shape, texture, size, and movement.
- Note unusual as well as expected findings.
Palpation
- Tell the patient what to expect, such as occasional discomfort, as you apply pressure. Encourage the patient to relax, because muscle tension and guarding can interfere with the performance and results of palpation.
- Provide just enough pressure to assess the tissue beneath one or both hands. Then release the pressure and gently move to the next area, systematically covering the entire surface you are assessing.
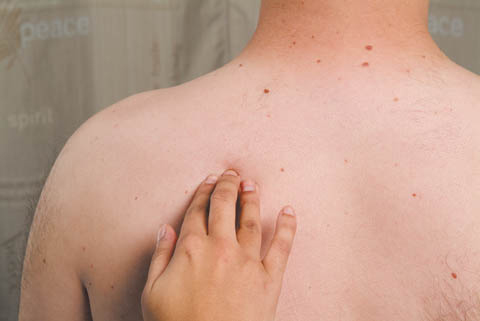
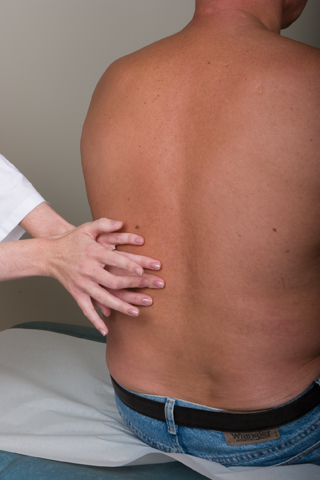
- To perform light palpation, depress the skin (as shown below), indenting it ½" (1.3 cm). Use the lightest touch possible because excessive pressure blunts your sensitivity.
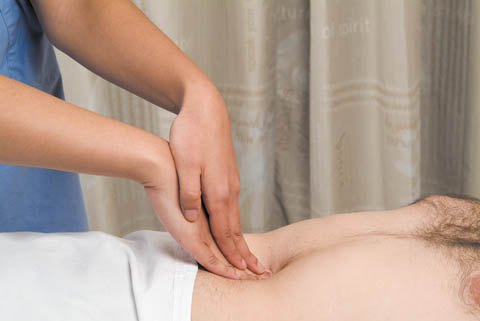
- If the patient tolerates light palpation and you need to assess deeper structures, palpate deeply by increasing your fingertip pressure, indenting the skin ¾" to 1½" (2 to 3.8 cm). Place your other hand on top of the palpating hand (as shown below) to control and guide your movements.
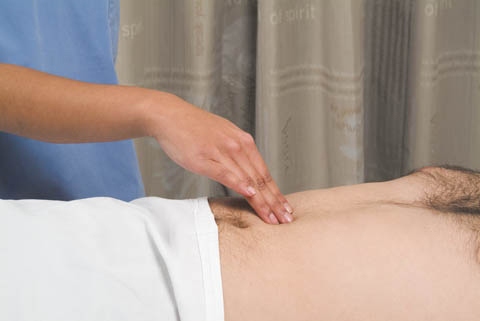
- To perform light ballottement, apply light, rapid pressure (as shown below) from quadrant to quadrant on the patient's abdomen. Keep your hand on the skin to detect tissue rebound.
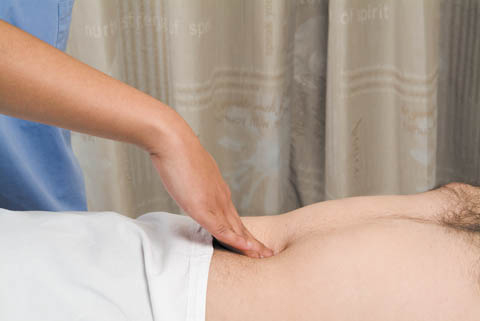
- To perform deep ballottement, apply abrupt, deep pressure (as shown below), and then release it. Maintain fingertip contact to detect tissue rebound.
- Use both hands (bimanual palpation) to trap a deep, underlying, hard-to-palpate organ (such as a kidney or the spleen) or to fix or stabilize an organ (such as the uterus) with one hand while you palpate it with the other.
Percussion
- First, decide which percussion technique best suits your assessment needs. Indirect percussion helps reveal the size and density of underlying thoracic and abdominal organs and tissues. Direct percussion helps assess an adult's sinuses for tenderness and elicits sounds in a child's thorax. Blunt percussion aims to elicit tenderness over organs, such as the kidneys, gallbladder, or liver. Note the characteristic sounds when percussing.
| IDENTIFYING PERCUSSION SOUNDS | |||||
|
Percussion produces sounds that vary according to the tissue you're percussing. This table lists important percussion sounds along with their characteristics and typical sources. |
|||||
|
Sound |
Intensity |
Pitch |
Duration |
Quality |
Source |
|
Dullness |
Soft to moderate |
High |
Moderate |
Thudlike |
Liver, full bladder, pregnant uterus |
|
Flatness |
Soft |
High |
Short |
Flat |
Muscle |
|
Hyperresonance |
Very loud |
Very low |
Long |
Booming |
Hyperinflated lung (as in emphysema) |
|
Resonance |
Moderate to loud |
Low |
Long |
Hollow |
Normal lung |
|
Tympany |
Loud |
High |
Moderate |
Drumlike |
Gastric air bubble, intestinal air |
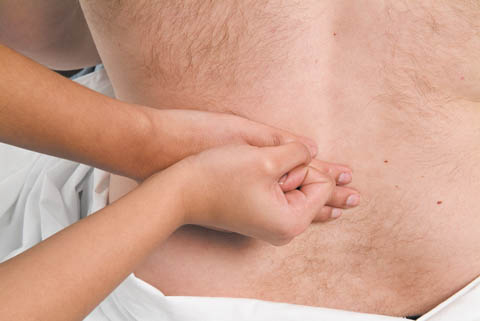
- To perform indirect percussion, place your nondominant hand firmly against the patient's body surface. With your wrist flexed loosely, use the middle finger of your dominant hand to tap the middle finger beneath the distal joint of your nondominant hand (as shown below). Tap lightly and quickly, removing your dominant middle finger as soon as you deliver each tap. Move your nondominant hand and repeat the procedure, covering the entire area to be percussed.
- To perform direct percussion, tap your hand or fingertip directly against the body surface.
- To perform blunt percussion, strike the ulnar surface of your fist against the body surface. Alternatively, place the palm of one hand against the body, make a fist with the other hand, and strike the back of the first hand (as shown below).
Auscultation
- First, determine whether to use the diaphragm or bell of the stethoscope. Use the diaphragm to detect high-pitched sounds, such as breath and bowel sounds.1 Keep in mind that you shouldn't describe bowel sounds as absent until you hear no sound for 5 minutes.20 Use the bell to detect low-pitched sounds, such as heart and vascular sounds.
- Place the diaphragm or bell of the stethoscope over the appropriate area of the patient's body. Place the earpieces in your ears.
- Listen intently to individual sounds and try to identify their characteristics. Determine the intensity, pitch, and duration of each sound, and check the frequency of recurring sounds.
Completing the procedure
- Return the bed to the lowest position to prevent falls and maintain the patient's safety.
- Remove and discard your gloves, if worn.
- Perform hand hygiene.
- Clean and disinfect your stethoscope with a disinfectant pad.
- Perform hand hygiene.
- Document the procedure.
![]() Special Considerations
Special Considerations
- Avoid palpating or percussing an area of the body known to be tender at the start of your examination. Instead, work around the area and then gently palpate or percuss it at the end of the examination. This progression minimizes the patient's discomfort and apprehension.
- Perform a variation on deep palpation to pinpoint an inflamed area deep within the patient's body: Press firmly with one hand over the area you suspect is involved. Then lift your hand away quickly. If the patient reports that pain increases when you release the pressure, you've identified rebound tenderness.
 Clinical alert: Suspect peritonitis if you elicit rebound tenderness when examining the abdomen.
- If you can't palpate because of the patient's fear of pain, try distracting the patient with conversation. Then perform auscultation and gently press your stethoscope into the affected area to try to elicit tenderness.
![]() Complications
Complications
Complications associated with assessment techniques may include rupture of an enlarged spleen or infected appendix (with palpation).
![]() Documentation
Documentation
Documentation associated with assessment techniques includes:
- assessment findings
- technique used to elicit each finding (for example, "Right lower quadrant tenderness on deep palpation, no rebound tenderness")
- abnormal findings
- name of the practitioner notified
- date and time of practitioner notification
- prescribed interventions
- response to those interventions
- teaching provided to the patient and family (if applicable)
- understanding of that teaching
- follow-up teaching needed.